Most modern mobile devices that have touch screens do
not require a stylus, which was necessary for resistivetouch-based
screens. Modern mobile devices are capacitive touch and respond very
well to touch with a finger.
Windows Phone 7 supports up to
four multi-touch contact points for XNA Framework development.
Silverlight for Windows Phone supports two multi-touch contact points.
As part of the platform, there is a touch driver and gesture engine
under the covers that provides a consistent detection capability across
hardware device OEMs and across applications.
As mentioned previously,
Silverlight for Windows Phone 7 is based on Silverlight 3. The Windows
Phone product team took the Silverlight 3 controls and APIs and
optimized the controls for performance, for look and feel via control
templates and styles and for input. The next section covers single-point
touch as it relates to the controls optimized for Windows Phone 7.
1. Single-Point Touch
When a user clicks a Button control, TextBox control, ListBox
control and the like on Windows Phone 7, it is single-point touch. For
consistency, single-point touch events are translated to the Mouse
events that you are familiar with when programming desktop Silverlight,
Windows Forms, or other application frameworks. For example, touching a
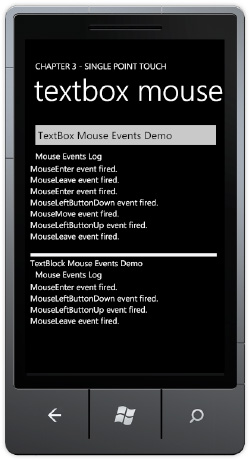
button appears as a Click event. Tapping to type text in a TextBox or touch a TextBlock control fires a MouseEnter, a MouseLeftButtonDown, a MouseLeftButtonUp, anda MouseLeave event.
SinglePointTouch project TextControlsMouseEventsPage.xaml page shows these events firing when you interact with the TextBox and TextBlockMouseEnter/MouseLeave pairs can fire. You can also see multiple MouseMove
events fire as well as a result of small movements in your finger when
interacting with the controls. It's something to consider when using
these events with touch, as opposed to mouse clicks on the desktop, and
why discrete events like listening for click or gestures is recommended
except when discrete touch points are required. Figure 1 controls. You will notice when testing on a device that sometimes multiple shows the UI with the mouse events trace.
Listing 1 shows the TextControslMouseEventPage.xaml code file with the XAML markup.
Example 1. WMAppManifest.xml Configuration File
<phone:PhoneApplicationPage
  x:Class="SinglePointTouch.Pages.TextBoxMouseEventPage"
  xmlns="http://schemas.microsoft.com/winfx/2006/xaml/presentation"
  xmlns:x="http://schemas.microsoft.com/winfx/2006/xaml"
  xmlns:phone="clr-namespace:Microsoft.Phone.Controls;assembly=Microsoft.Phone"
  xmlns:shell="clr-namespace:Microsoft.Phone.Shell;assembly=Microsoft.Phone"
  xmlns:d="http://schemas.microsoft.com/expression/blend/2008"
  xmlns:mc="http://schemas.openxmlformats.org/markup-compatibility/2006"
  FontFamily="{StaticResource PhoneFontFamilyNormal}"
  FontSize="{StaticResource PhoneFontSizeNormal}"
  Foreground="{StaticResource PhoneForegroundBrush}"
  SupportedOrientations="Portrait" Orientation="Portrait"
  mc:Ignorable="d" d:DesignHeight="768" d:DesignWidth="480"
  shell:SystemTray.IsVisible="True">

  <!--LayoutRoot is the root grid where all page content is placed-->
  <Grid x:Name="LayoutRoot" Background="Transparent">
    <Grid.RowDefinitions>
      <RowDefinition Height="Auto"/>
       <RowDefinition Height="*"/>
</Grid.RowDefinitions>

    <!--TitlePanel contains the name of the application and page title-->
    <StackPanel x:Name="TitlePanel" Grid.Row="0" Margin="12,17,0,28">
      <TextBlock x:Name="ApplicationTitle" Text="Chapter 3 - SINGLE POINT TOUCH"
                 Style="{StaticResource PhoneTextNormalStyle}"/>
      <TextBlock x:Name="PageTitle" Text="textbox mouse events" Margin="9,-7,0,0"
                 Style="{StaticResource PhoneTextTitle1Style}"/>
    </StackPanel>
    <!--ContentPanel - place additional content here-->
    <Grid x:Name="ContentPanel" Grid.Row="1" Margin="12,0,12,0">
      <StackPanel Orientation="Vertical">
        <TextBox HorizontalAlignment="Left" x:Name="MouseEventsTextBox"
          Text="TextBox Mouse Events Demo" Width="460" Height="72"
          MouseEnter="MouseEventsTextBox_MouseEnter"
          MouseLeave="MouseEventsTextBox_MouseLeave"
          MouseLeftButtonDown="MouseEventsTextBox_MouseLeftButtonDown"
          MouseLeftButtonUp="MouseEventsTextBox_MouseLeftButtonUp"
          MouseMove="MouseEventsTextBox_MouseMove"
          MouseWheel="MouseEventsTextBox_MouseWheel" />
        <TextBlock Height="30" HorizontalAlignment="Left" Margin="12,0,0,0"
                   x:Name="MouseEventStatusText" Text="Mouse Events Log"
                   Width="438" />
        <ListBox Height="217" x:Name="MouseEventLogListBox" />
        <Rectangle Fill="#FFF4F4F5" Height="10" Stroke="Black" Margin="0,0,6,0"/>
        <TextBlock TextWrapping="Wrap" Text="TextBlock Mouse Events Demo"
          Margin="0" Name="TextBlockMouseEventsDemo"
          MouseEnter="TextBlockMouseEventsDemo_MouseEnter"
          MouseLeave="TextBlockMouseEventsDemo_MouseLeave"
          MouseLeftButtonDown="TextBlockMouseEventsDemo_MouseLeftButtonDown"
          MouseLeftButtonUp="TextBlockMouseEventsDemo_MouseLeftButtonUp"
          MouseMove="TextBlockMouseEventsDemo_MouseMove"
          MouseWheel="TextBlockMouseEventsDemo_MouseWheel" />
        <TextBlock Height="30" HorizontalAlignment="Left" Margin="12,0,0,0"
          x:Name="MouseEventStatusTextBlock" Text="Mouse Events Log"
          Width="438" />
        <ListBox Height="220" x:Name="MouseEventLogListBox2" />
      </StackPanel>
    </Grid>
  </Grid>
</phone:PhoneApplicationPage>
|
In Listing 1, you can see the event handler assignments like this one assigning an event handler to the MouseEnter event for the MouseEventsTextBox object
MouseEnter="MouseEventsTextBox_MouseEnter"
The code-behind file has the related event handlers that simply write a text message to the MouseEventLogListBox like this one
private void MouseEventsTextBox_MouseEnter(object sender, MouseEventArgs e)
{
  MouseEventLogListBox.Items.Add("MouseEnter event fired.");
}
Now that we have covered the mouse events, we will next look at how to use the mouse events for raw touch.